
Adjust brightness, contrast and colour
Fix a photo that is too dark or flat, sharpen a soft shot, or turn pictures black and white or sepia. Apply the same changes to a whole set at once.
Your image will be processed on this device.
How to adjust brightness, contrast and colour
- Select or drop one or more images.
- Choose a preset or move the sliders, and watch the preview.
- Select Apply to all images, then download each one or all of them as a ZIP.
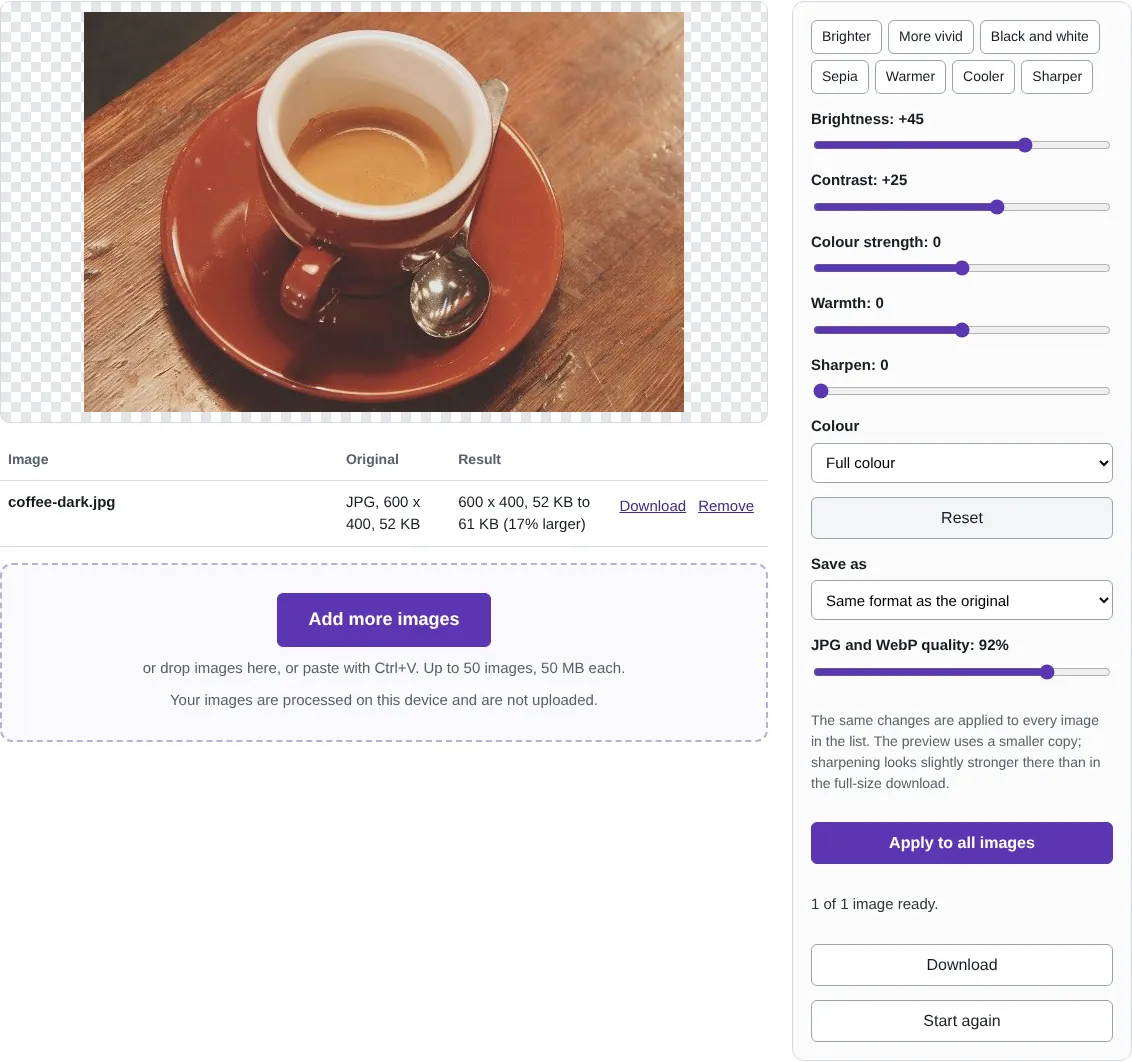
Worked example: rescuing a dark photo
We started with a deliberately dark, flat 600 x 400 photo of a cup of coffee (52 KB). Setting Brightness to +45 and Contrast to +25 brought back the colour of the cup and the grain of the table, and the preview showed the change as the sliders moved. The adjusted JPG was 61 KB, a little larger because the picture now holds more visible detail.
The Black and white preset on the original coffee photo gave a 67 KB JPG, slightly smaller than the 71 KB colour version. On a 12 megapixel photo, brightening and sharpening together took under a second on our slow two-core test computer.
What each slider does
Brightness lightens or darkens everything evenly. Contrast pushes light and dark parts further apart, which makes a flat, hazy photo look crisper; too much loses detail in the brightest and darkest areas. Colour strength makes colours more or less intense, and -100 removes colour completely. Warmth shifts the picture towards orange or blue, which can correct the cold look of indoor or overcast photos.
Sharpen strengthens the edges of details. It helps a slightly soft photo, but it cannot fix a blurred one, and a high setting adds bright outlines around edges. The preview uses a smaller copy, where sharpening looks a little stronger than in the full-size download.
Black and white, sepia and batches
Black and white converts colours to shades of grey based on how bright they appear to the eye, so a red cup and a green leaf of the same brightness become the same grey. Adding a little contrast usually makes a black and white photo look less flat. Sepia gives a warm brown tone like an old print.
Every image in the list gets the same changes, which keeps a set of photos looking consistent, for example the pictures in a property listing or a product range. Use the Preview list to check how the settings look on each photo before applying them.
Good to know
- Brightness, contrast, colour strength and warmth each run from -100 to +100; 0 leaves the picture unchanged.
- Sharpening brings out edges in a slightly soft photo. Too much adds bright halos, so check the preview.
- The same changes are applied to every image in the list.
- Saved copies do not include location or camera details from the original.
Why your images stay on your device
RedactNinja Image runs in your web browser. When you choose an image, it is read and processed on your own computer, tablet or phone. It is not uploaded to a server, so there is nothing for us to store, look at or delete afterwards. The background remover and face finder use small AI models that your browser downloads from this site the first time you need them; the models come to your image, not the other way round.
You can check this yourself: open your browser's developer tools, select the Network tab and use a tool. Your image does not appear in the requests. The tools load no advertising or analytics code. How to check that nothing is uploaded.
Free, with no sign-up and no watermark
Every tool is free to use without an account. Nothing is added to your images, and there are no daily limits. Very large images depend on your device's memory, so older phones may be slower.
Questions about Adjust colours
How do I make a photo black and white?
Choose the Black and white preset, or set Colour to Black and white and adjust the contrast to taste.
Can I undo the changes?
Select Reset to go back to the original. Your original files are never changed.
Are my images uploaded?
No. The tool runs in your browser and processes the image on your device. Nothing is sent to a server.
Is it free?
Yes. There is no account, no watermark and no daily limit.
Related tools
All image tools
Edit
- Remove background
- Resize image
- Crop image
- Rotate image
- Adjust colours
- Add watermark
- Annotate screenshot
- Combine images
Make smaller and convert
- Compress image
- Convert image
- HEIC to JPG
- PNG to JPG
- JPG to PNG
- WebP to JPG
- WebP to PNG
- JPG to WebP
- Favicon and icon maker