
Add a watermark to images
Put your name, website or logo on your photos before you share them, in a corner or repeated across the picture. Set it up once and apply it to a whole batch.
Your image will be processed on this device.
How to add a watermark to images
- Select or drop one or more images.
- Choose Text and type your watermark, or choose Logo and pick a PNG of your logo.
- Set the size, opacity and position, and check the preview.
- Select Add watermark, then download each image or all of them as a ZIP.
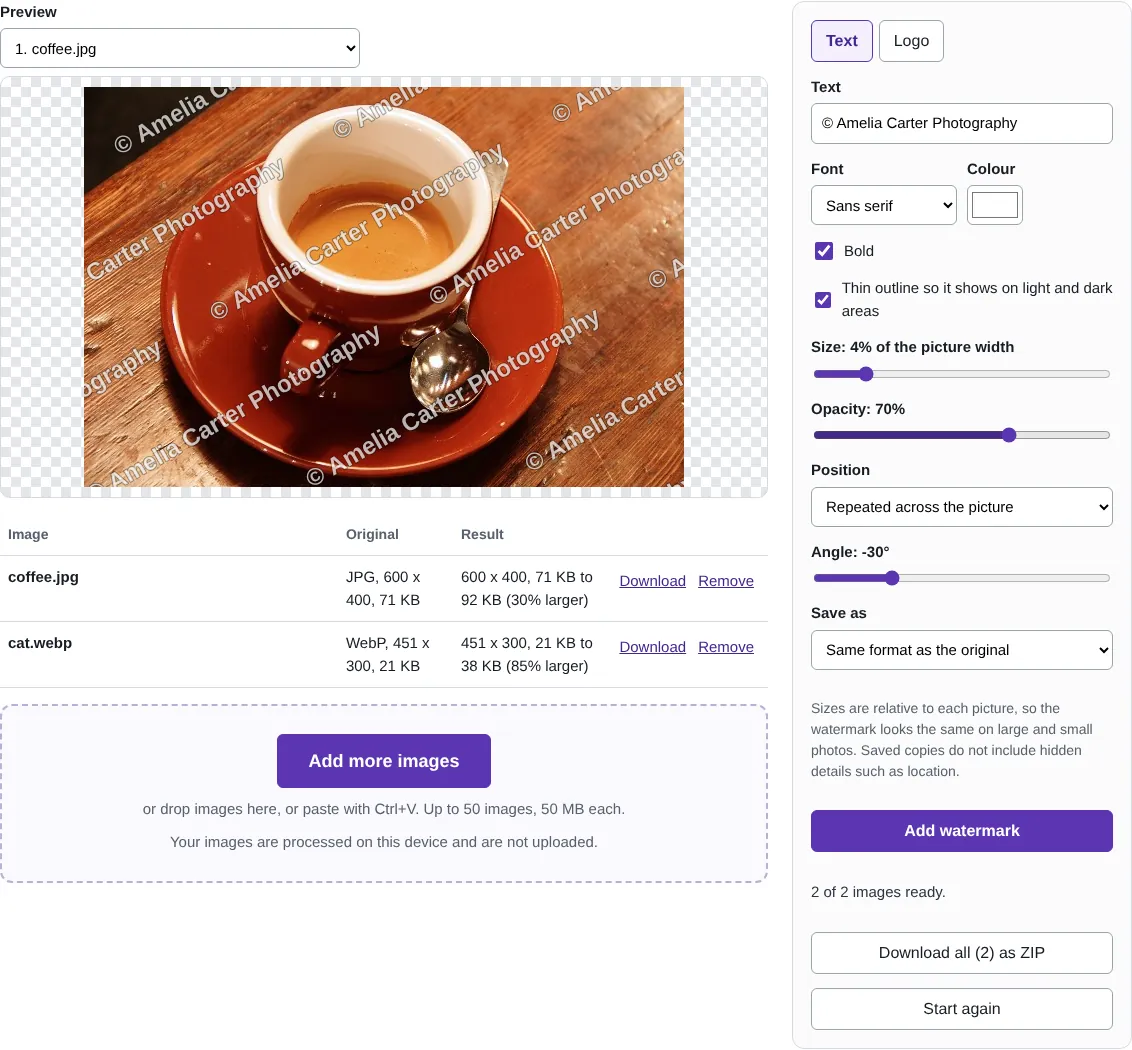
Worked example: protecting photos before posting them
We watermarked two photos together, a 600 x 400 JPG of a cup of coffee and a 451 x 300 WebP of a cat, with the text "© Amelia Carter Photography" in bold, 4% of the picture width, 70% opacity, repeated across the picture at -30 degrees. The preview updated as each setting changed, and both photos were done in one go.
The watermarked JPG grew from 71 KB to 92 KB and the WebP from 21 KB to 38 KB: sharp-edged text adds detail that takes more space to store. On a 12 megapixel photo, adding a repeated watermark took under half a second on our slow two-core test computer.
Corner or repeated: choosing a watermark style
A small watermark in a corner credits your work without spoiling the picture, which suits social media and portfolios. It is also easy to crop off. A semi-transparent watermark repeated across the whole picture is much harder to remove, which suits proofs sent to clients before payment or photos of documents you want to mark as copies.
Opacity around 30% to 50% keeps a repeated watermark visible without hiding the photo. For a corner watermark, 70% to 100% with the thin outline turned on reads well on both bright skies and dark shadows.
Using a logo
Choose Logo and pick an image of your logo. A PNG with a transparent background blends in cleanly; a JPG logo brings its white or coloured box with it. Size is a percentage of each photo's width, so the logo is the same proportion on a landscape photo and a small portrait one.
The watermark is drawn into the pixels of the saved copy, so it cannot simply be switched off, and the original files on your device are not changed. Keep those originals in case you want a different watermark later.
Good to know
- Sizes are a percentage of each picture, so the watermark looks the same on large and small photos.
- A repeated watermark across the picture is much harder to crop out than one in a corner.
- A thin outline keeps text readable on both light and dark parts of a photo.
- The watermark becomes part of the picture in the saved copy; keep your original without it.
Why your images stay on your device
RedactNinja Image runs in your web browser. When you choose an image, it is read and processed on your own computer, tablet or phone. It is not uploaded to a server, so there is nothing for us to store, look at or delete afterwards. The background remover and face finder use small AI models that your browser downloads from this site the first time you need them; the models come to your image, not the other way round.
You can check this yourself: open your browser's developer tools, select the Network tab and use a tool. Your image does not appear in the requests. The tools load no advertising or analytics code. How to check that nothing is uploaded.
Free, with no sign-up and no watermark
Every tool is free to use without an account. Nothing is added to your images, and there are no daily limits. Very large images depend on your device's memory, so older phones may be slower.
Questions about Add watermark
Can I use my logo?
Yes. Choose Logo and pick an image of it. A PNG with a transparent background gives the cleanest result.
Can a watermark be removed?
A small one in a corner can often be cropped or painted out. A semi-transparent watermark repeated across the picture is far harder to remove.
Are my images uploaded?
No. The tool runs in your browser and processes the image on your device. Nothing is sent to a server.
Is it free?
Yes. There is no account, no watermark and no daily limit.
Related tools
All image tools
Edit
- Remove background
- Resize image
- Crop image
- Rotate image
- Adjust colours
- Add watermark
- Annotate screenshot
- Combine images
Make smaller and convert
- Compress image
- Convert image
- HEIC to JPG
- PNG to JPG
- JPG to PNG
- WebP to JPG
- WebP to PNG
- JPG to WebP
- Favicon and icon maker