
Annotate a screenshot
Point out the button to click, number the steps in a how-to, highlight an error message or cover a password before you share a screenshot.
Your image will be processed on this device.
How to annotate a screenshot
- Paste a screenshot with Ctrl+V, or select or drop an image.
- Choose Arrow, Box, Highlight, Number, Text or Cover, and a colour.
- Drag on the picture to draw, or click to place a number or text. Undo removes the last mark.
- Download the image as PNG, JPG or WebP.
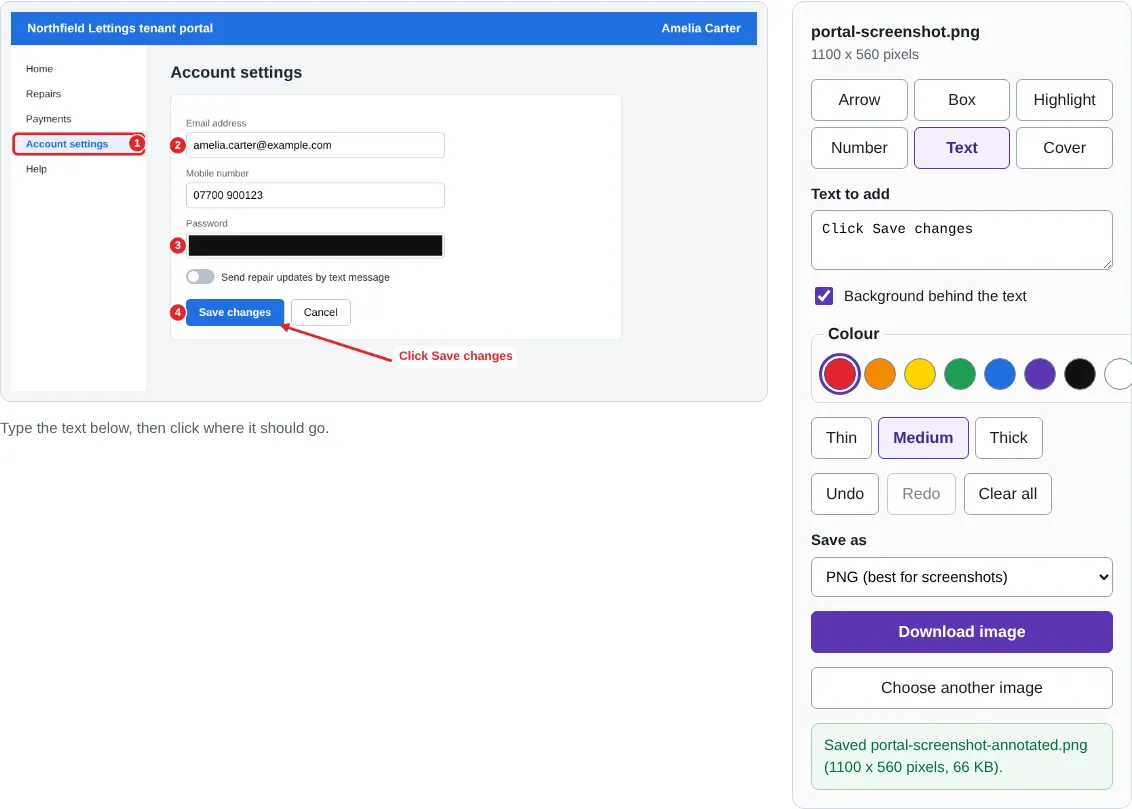
Worked example: a how-to screenshot
We annotated a fictional 1,100 x 560 pixel screenshot of a tenant portal's account settings page. A box marked the Account settings menu item, four clicks with Number labelled the steps 1 to 4, Cover blacked out the password field, and an arrow with the text "Click Save changes" pointed at the button.
The finished PNG was 66 KB and kept the screenshot text sharp. Undo and Redo step back and forward through the marks, so a misplaced arrow is one click to remove.
The tools, and when to use each
Arrow points at the thing to click or look at; drag from where it starts to its tip. Box draws a rounded outline round an area such as a menu or a setting. Highlight works like a highlighter pen over text, and Number drops numbered circles for step-by-step instructions. Text adds a short note, with a background so it reads on any part of the screenshot.
Line widths, numbers and text scale with the screenshot, so the marks look the same size on a phone screenshot and on a 4K monitor capture. Choose Thin, Medium or Thick, and one of eight colours; red and blue stand out on most interfaces.
Covering sensitive details before you share
Screenshots often include an email address, a phone number, an account or ticket number, or part of a password. Cover replaces the area with a solid block in the saved image, so what was underneath cannot be recovered from that file. Blurring text is less safe: light blur or pixelation can sometimes be reversed.
Check the whole screenshot before sharing it, including browser tabs, notifications and the clock area. For faces in photos, Blur faces and details finds them automatically, and Image to text can help you spot text you may have missed.
Good to know
- Numbers count up by themselves, so clicking in order labels the steps 1, 2, 3.
- Line widths and text sizes scale with the picture, so marks look the same on a phone screenshot and a 4K one.
- Cover replaces the area with solid colour in the saved image, so a password or email address under it cannot be recovered from that file.
- PNG keeps screenshot text sharp; JPG gives a smaller file for photos.
Why your images stay on your device
RedactNinja Image runs in your web browser. When you choose an image, it is read and processed on your own computer, tablet or phone. It is not uploaded to a server, so there is nothing for us to store, look at or delete afterwards. The background remover and face finder use small AI models that your browser downloads from this site the first time you need them; the models come to your image, not the other way round.
You can check this yourself: open your browser's developer tools, select the Network tab and use a tool. Your image does not appear in the requests. The tools load no advertising or analytics code. How to check that nothing is uploaded.
Free, with no sign-up and no watermark
Every tool is free to use without an account. Nothing is added to your images, and there are no daily limits. Very large images depend on your device's memory, so older phones may be slower.
Questions about Annotate screenshot
How do I take a screenshot to paste?
On Windows press Windows+Shift+S, on a Mac press Cmd+Shift+4, then select the area and press Ctrl+V or Cmd+V on this page.
Can I move a mark after drawing it?
Not yet. Use Undo to remove the last mark and draw it again.
Are my images uploaded?
No. The tool runs in your browser and processes the image on your device. Nothing is sent to a server.
Is it free?
Yes. There is no account, no watermark and no daily limit.
Related tools
All image tools
Edit
- Remove background
- Resize image
- Crop image
- Rotate image
- Adjust colours
- Add watermark
- Annotate screenshot
- Combine images
Make smaller and convert
- Compress image
- Convert image
- HEIC to JPG
- PNG to JPG
- JPG to PNG
- WebP to JPG
- WebP to PNG
- JPG to WebP
- Favicon and icon maker